Microsoft has announced the end of Access Web Apps. Not, as is usually the case, end of support for the product, which actually means that you can go on using the application as long as you don't need support from Microsoft for that application. Some people (perhaps just a handful) still use Access 97, for example, twenty years later. Access 97, of course, is long out of support, but still working. This is different.
Rather, if you have Access Web Apps (AWAs) running on an Office 365 site, those Access Web Apps will be removed from your Office 365 site in April, 2018.
If you have an on-premises installation of SharePoint, Access Web Apps will continue to run for the normal SharePoint product life cycle, however long that turns out to be. I'll leave it to you to sleuth through the Microsoft sites to figure that one out, but it is probably going to be five years.
The end of the line for Access Web Apps means you need to start now to get your AWAs converted to a new technology. That, in turn, means you have two tasks ahead of you in the next few months:
- Rewrite the interface from the current browser-based environment to "something else”, whatever you decide it needs to be.
- Get the data for your existing AWAs out of the SQL Azure database behind them before the database is dropped from its SQL Azure home.
If you have a pure AWA application, running only in a browser, you'll have to pick a different way to provide a new interface.
Your choices include:
- A hybrid Access accdb/SQL Server architecture
- .Net application architecture.
- Other desktop or browser based development environments.
In a way, you might think of this as an opportunity to really get the interface right. The “railed” experience of AWAs left a lot to be desired, to be frank. Unfortunately, that’s not much comfort to those faced with ramping up a new development effort, I suppose. It can be costly and time consuming to pick a new development tool, design a new interface and data logic layer and then design, test and deploy it.
Fortunately, getting your data out the SQL Azure database is a different matter. It's not that hard to do. In fact, there are at least three ways to get your data out of the SQL Azure database behind an Access Web App:
- Link your AWA's tables to an accdb and, using the built-in conversion function, convert them to local Access tables in that accdb.
- Export your AWA's tables to SharePoint lists on your current Office 365 site.
- Extract a dacpac from an app package created in the Access design tool using the Save As option.
There are other, less straightforward, ways to do it than these three; perhaps they would be familiar to Access developers. However, given the ease and simplicity of these three options, we should give preference to them, IMO. Let’s quickly review the first two.
Convert To Local Tables in Access
One way to get your tables from the SQL Azure database into an Access accdb is to
convert to local tables. If you’ve created a hybrid database with an Access
accdb linked via ODBC to the tables in your SQL Azure database, you can use a
built-in function in the Access accdb to get the tables into the accdb. Or, if
you haven’t already done so, you can create an accdb and use the credentials
from your AWA to connect that accdb to the SQL Azure (or SQL Server) database
and create those linked tables. That’s usually a rather trivial task, actually,
and we don’t need to cover it in great detail.
To get the credentials you need,
go to the Backstage in your accdw and select “Manage-Connections”.

|
| Figure 1. Get the Credentials to Create ODBC-Linked Tables in an accdb |
I will assume, for the purposes of this discussion, that you can take it from
here. You can also see in Figure 1 that you can create a similar accdb by
selecting “Report on my Data”. That creates a read-only accdb with the links
you need to the SQL Azure tables. It will work for the next step even though
the linked tables themselves are read-only. Once you have them in an accdb,
they are read-write.

|
| Figure 2. Convert Linked Tables to Local Tables
|
This screenshot of the short-cut menu ought to be sufficient to get you going. Just right-click on a table and select the Convert to Local Table option. This method requires manual conversion, one table at a time, so in a database with many tables, it could be tedious, although it is pretty easy to understand.
If you want to revert back to an Access FE/Access BE design, this is about as simple as it gets. Just keep in mind that this is no longer going to be a cloud-facing design; if that’s important, you might want to keep looking for another data export strategy.
Let’s consider Microsoft’s official strategy for exporting tables from your AWA into a different storage container next.
Create SharePoint Lists from your SQL Azure Tables
This method—exporting the tables from your AWA’s SQL Azure database to SharePoint lists—has been outlined
on the Office Support Site.
This strategy is in keeping with the assumption that many of the Access Web Apps created by Office 365 users will be adequately supported as SharePoint lists.
And that is, no doubt, true,
IF you want to maintain your Office 365 platform as a way to share the data across locations.
I also expect that a fairly high percentage of existing AWAs fall into the "small-to-medium sized" range, which would fit comfortably within the SharePoint List environment.
On the other hand, SP lists do limit your ability to create a new web-based interface, unless you happen to be skilled with SharePoint.
I have exported the tables from a handful of my own AWAs this way, with mixed success, to be frank. One of them, fairly small, went quickly.
Another, with more than 43,000 records in each of two tables (86,000 + in all), failed to completely export after running 24 1/2 hours.
All of the data was copied into SharePoint lists. However, the process failed during the next phase—creating the relationship lookups on those two large tables.
If all I had wanted was the data, that might be tolerable. But without relationships, you really don’t have a relational database, now do you?
If you want to go this route, the steps are quite straightforward. Open the AWA in
your browser. Under Settings (the “gear” icon in the upper right hand corner of
the page), click the recently added option “Export to SharePoint Lists”.

|
| Figure 3. Select Export to SharePoint List from the Settings "Gear"
|
When the dialog opens, click “Yes” to start the export.

|
| Figure 4. Click Yes to Start the Export
|
The next dialog is primarily informative. It provides the location of the new subsite where the exported lists will be saved.

|
| Figure 5. Location of the Subsite with your Newly Exported SharePoint Lists
|
| Clicking the “OK” button starts the export.
|

|
| Figure 6. The Export Has Started
|
Export progress is updated for each table as it is processed. There are a few steps involved.
- The first is creating the list
- The next is exporting your data to those lists.
- Then, lookups are created between fields in the lists to manage the relationships defined in the SQL Azure database.
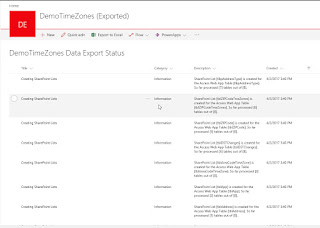 Figure 7. Periodically Refresh the Page to Follow Progress of the Export
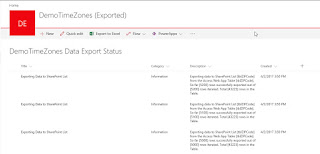 |
| Figure 8. Progress for Large Tables Being Exported to Sharepoint |
That was how it went for the first two attempts I made to export existing AWAs, however, there were two problems, one with this large AWA and one with my most important personal AWA.
For the tables shown in Figures 7 and 8, the data was exported, but the process
failed at the next step— creating the lookups to support relationships.
Fortunately for me, I have a better strategy for getting this data out of the SQL
Azure database anyway. I’m including this example as a caution about what you might
expect if you choose this export strategy.
Even more problematic, the third AWA I tried to export repeatedly failed to even
begin creating lists. I’m still not sure what the problem is with that one. I’m
still working on that, but I’m not particularly worried about it because I have
a better way to do this anyway, particularly for databases that I want to move
to SQL Server, not as SharePoint lists.
Let’s look now at a strategy for moving the entire SQL Azure database behind your AWA
into another SQL Server. That target database can be an on-premises SQL Server,or a SQL Azure instance.
Deploy a dacpac
Dacpacs have been supported in SQL Server since the 2008 R2 version
If you want to move your data into a different SQL Server database, either a SQL
Server or SQL Azure, here’s how you can get that database moved quickly in just
a few steps, using a dacpac from your current AWA’s SQL Azure database.
Start by creating an app package from your Access Web App using the Save As function.
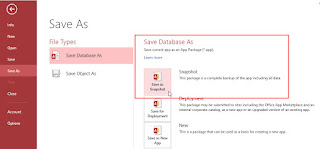 |
| Figure 9. Save an App Package From Your Access Web App |
The app package contains all of the
components from the original AWA, including the dacpac, which is what we are
interested in right now. Save it to a folder on your hard drive, like this one.
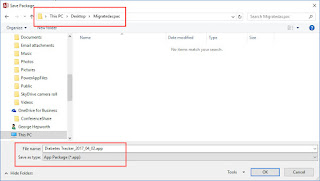 |
| Figure 10.Saved Location for Your App Package |
It may take a few minutes to create the app package, depending on the amount of
data in it. The app package is actually a zip file containing several other files that make up
the AWA. Changing the extension to .ZIP allows you to extract the dacpac from it.
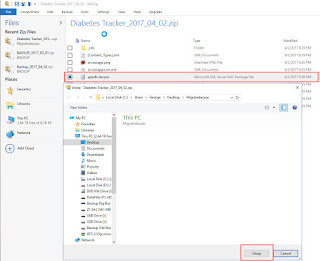 |
| Figure 11. Find and extract the dacpac in your renamed app package |
The dacpac in all app packages is named the same, “appdb.dacpac.” Therefore, when
you have extracted it for the next step, you’ll immediately want to rename it
to reflect the AWA to which it belongs.
 |
| Figure 12. Extracted and Renamed dacpac |
Now, open SQL Server Management Studio (SSMS) and connect to the SQL Server instance
to which you plan to migrate the database. This can be a local SQL Server
instance, a network SQL Server instance, a remotely hosted SQL Server instance, or SQL Azure. I’m
going to use a local instance for this demonstration, but ultimately, to enable
cloud-based support for the replacements for my existing AWAs, I’ll move them to SQL Azure.
 |
| Figure 13. Connect to Your Target SQL Server |
Right-mouse click on the Databases node, highlighted in Figure 13, and select Deploy Data-tier Application from the
short-cut menu, as shown in Figure 14.
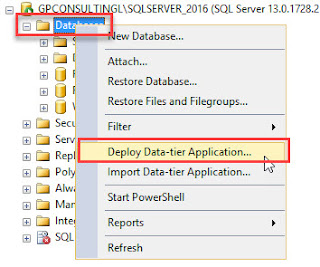 |
| Figure 14. Select Deploy Data-tier Application from the Shortcut Menu |
The wizard will open and lead you through the steps needed to create the new
database on this SQL Server instance.
Start by using the Browse button to locate and select the dacpac you just extracted
and renamed.
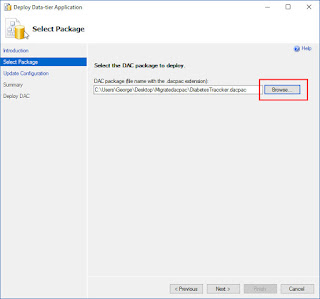 |
| Figure 15. Browse to and Select the dacpac |
The wizard assigns the name of the dacpac as the default name of the database to be
restored.
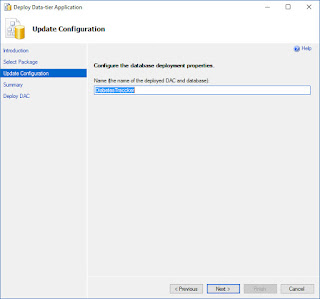 |
| Figure 16. Default Database Name Obtained from dacpac file |
Note that I accidentally misspelled the name of the app, and then retained that misspelling from the dacpac file while working on this demo. However, you
could change it here if you don’t want to keep the original name, which would be, as previously noted, “appdb.dacpac” in all app packages. Once you’ve set things
up, you are ready to start the deployment. Aside from the default name for the database, the wizard will take you step to step, normally with no issues.
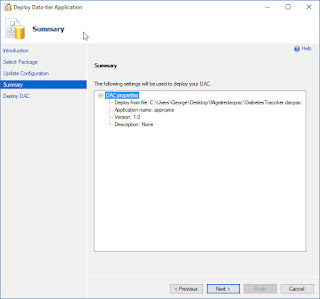 |
| Figure 17. Click Next to Start the Deployment |
During the deployment, the dialog will continually update, showing you progress and the success or failure of each step.
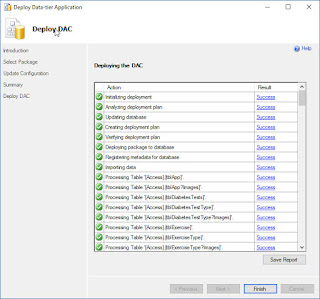 |
|
Figure 18. Progress of Deployment |
When the deployment completes, you can browse the Databases
node again, select the newly created database, and work with it exactly as you
normally do with other SQL Server databases.
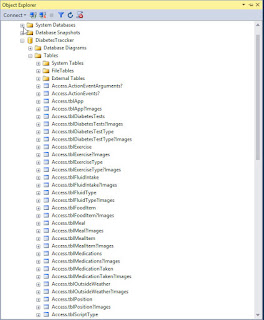 |
| Figure 19. Completed Deployment of Your Database |
At this point, the entire database from your AWA’s SQL Azure server is now replicated on its new
home. You will probably make additional modifications. For example, as you can
see in Figure 13, the original SQL Azure database includes “xxx?image” tables
which you probably not need any longer. These tables were introduced into AWAs
to make handling images more efficient. If you have a lot of images in your
existing AWAs, fixing this up will require additional strategy and effort. I’ll
have to leave that to another time, though.
Summary and Next Moves
There you have it. Three ways to get your data out of the SQL Azure database behind
an Access Web App. There are, no doubt, other ways to do it that are less
straightforward, but perhaps more familiar to Access developers. However, given
the ease and simplicity of the options, we should give preference to them, IMO.
I will move all of my own AWAs from the limited SQL Azure database environment
behind them onto a full SQL Azure platform. In addition to retaining their
cloud-based capabilities, that opens up the ability to manage and enhance them with SQL Server Management Studio (SSMS) just as one would with any other database. That means writing your own stored
procedures, views and functions, and all of the rest.
Cost may be a bigger factor. One of the many benefits of the AWA platform was that a
single $6.00 a month Office365 license allowed you to create multiple AWAs in
that site, each capable of supporting hundreds of users. The cost of a standard
SQL Azure account with multiple databases is potentially much greater, although
they can scale to support the same number of users, or greater, as needed.
And to reiterate, I see the primary pain point in this transition being that
you will have to create a new interface for each of your AWAs. Getting the data
out of them is relatively simple, straightforward, and inexpensive by comparison.
My advice, therefore, is to start practicing how to extract your data. Once you have designed and deployed your new interface, migrating your data to its new home for real will be relatively straightforward.


