This is the third, and possibly the last, in a series of blog posts on my experiences migrating data from a working Access/SQL Server database to SharePoint, where it now serves me daily. It's a "hybrid" database, in the sense that the Front End is the original Access accdb, complete with all of the original VBA intact, while the Back End lives on SharePoint.
A couple of posts back I introduced you to this small project. In that initial post, I told you about the problem of "disappearing Primary Keys". To be honest, of course, Primary Keys don't really disappear. However, SharePoint does a really good job both of disguising them and hiding them from you. Unless you know how that happens and why, you might be as confused as I was at first. You do know all about that now, of course, because you've read my first blog post on the topic. The major consequence of that trick with Primary Keys is that it causes any relationships you've defined on those tables to go all squirrelly. "Squirrelly" is a software term that means, more or less, your relationships go flying off in random directions without much guidance or purpose.
In the second blog post in this series, I told you how I went about patching up those lost relationships between existing tables.
All of the tables I used as demos in those first two phases of the data migration held small numbers of records--no more than a few hundred. However, if you are migrating a lot of data to a new SharePoint database, as I was, you probably have tables holding many thousands of records. That's a whole different story. When your recordsets go over a few hundred rows, you'll definitely want to adopt a different strategy, one based on advanced planning and some staging steps to get the tables and data ready to make the journey.
A Journey of Seven Thousand Records
Et Tu, Bruto
A Journey of Seven Thousand Records
As you may recall from the two previous posts, the data I migrated in this project came from a decade-old database, most recently with a SQL Server back end. I copied it all to my Office 365 Hosted SharePoint site. I'll use the term "migrate" in the rest of this blog to describe that process, in which I copied all of the records from one table to the other. Of course, the Access Front End remains as before; it's just connected to a different set of tables. The migration went well, once I figured out how to handle the little gotchas that cropped up. I've been using this SharePoint version for several weeks and couldn't be happier.
One of the most significant problems appeared when I was trying to upload the larger tables to SharePoint. These tables hold several thousand records each. The two largest tables, daily work details and invoice details, held over 7,500 records and over 5,700 records respectively. (It turns out I don't bill for every hour I record in this database. Go figure.)
Et Tu, Bruto
I found that I couldn't safely move more than a few hundred records at a time if I tried to do it the "brute force" way. "Brute force" would be clicking on a table, pointing it at a SharePoint site, and clicking the button to copy the data. The big culprit, I think, was that SharePoint was trying to index fields all during the migration. A lot of work was going on behind the scenes, and SharePoint and Access simply couldn't keep up. SharePoint couldn't import thousands of records and manage the indexes and referential integrity on the Foreign Key fields in those records efficiently in a single go.
Eventually, I realized that a more disciplined, planned and phased approach was going to work out better, with fewer cuss words and less frequent "do overs". The overall time it took move the data from linked Access tables to SharePoint wasn't all that much shorter because of the preparation work that went into staging the tables for migration. Yet, I was far less frazzled when it was over. In the following paragraphs, I'll describe the method I worked out to "stage" my larger tables for migration.
He that filches from me my good name robs me of that which not enriches him and makes me poor indeed
The first step in a planned migration is to create a staging query, based on the table to be migrated. It'll look like this one in Figure 2. It has several advantages over the previous "Brute Force" approach.
First, using a select query on the source table allows us to include only the fields we need to establish in the destination table. As you recall from my previous post, one of the by products of a "brute force" approach was that all of the SQL Server fields in the source table went along for the ride, even though we didn't need or want them in the final results
Exporting this query to a SharePoint Site is very much like sending a table would be. Here's a refresher of the Export dialog you saw last time.
I selected the destination SharePoint site as I did before with the full table. This time, though, I want to rename the destination table because the query name is meaningless. The exact name is important, but not critical. You can rename it later, on SharePoint, if you need to do so. As you can see, I made this one quite unique so it will be readily identifiable in later steps.
Because we are creating a list, but not migrating any records to it, the creation should be quicker than before, when we were migrating records in this step. If you left the checkbox "Open the list when finished" checked, SharePoint will show you the resulting, empty table. See Figure 6.
Sharp eyes comparing this screenshot to the one in my previous post might notice that, for this post, I used my AccessHosting.com Site, instead of my Office 365 Site. For a lot of reasons, I really prefer the Access Hosting experience for Access Web Database. For one thing, they support Online Reports better than O365 does. Nonetheless, for the purposes of this blog, the migration process is the same on both. I also migrated the same table to Office 365, just to confirm that it was going to be the same.
The first change I had to make to this new SharePoint list in order for it to be usable as a destination for thousands of records was to create the relationship fields to relate this table to other relevant lists, or tables, in the database. The ones we're going to need are "WorkKey" and "WorkRateKey". Again, though you can see THREE "_old" fields in Figure 8, only two are Foreign Keys, the other one, "WorkWorkKey_Old" will contain the OLD Primary Key values from the source table.
We'll need two of these Lookup Fields, but if I show you one; you could figure out how to create the other one the same way. I named this Field the same as the OLD foreign key was in the source table. Don't forget, these tables need to take over the role of the old SQL Server tables in the original Access FE when we're done, so keeping the names straight is crucial to avoid refactoring the interface. This field needs to be a Lookup Field to support our purposes for it.
I split the screenshot into two halves (Figure 9 above and Figure 10 below) so you can see them better.
You know, it occurs to me (and I hope it also occurs to you) that, although this interface looks very different from the Access Lookup Field Wizard we saw in the previous blog, it involves the same elements needed to do the job:
Clicking on the link takes us to a screen where we can define indexes for non-key fields. I added two indexes, but I'll only show how I did the first one, on the WorkDate field. You can figure it out from there.
Select a field from the dropdown on the screen--I used "WorkDate" for this example--and click "Create" to make it so. That takes you back to the Index screen where all of the indexed fields are displayed.
By the way, this Indexes screen doesn't show you the index on the Primary Key field, but it's there. You can only see the non-Primary Key indexes, which include those on Foreign Key fields, of course, and on the fields to which you add indexes manually.
If you follow the same steps as I showed you in the previous post, you'll soon have a linked SharePoint table that looks like Figure 15. However, unlike the tables we looked at in the previous blog post, though, this one has no records in it yet. For our purposes now, that is a good thing.
On the Access side you can now see the new Primary Key field that SharePoint provided when it created this list. It's called "ID", which is the default for all new Primary Key fields. Remember, we used the staging query to create this list, not the table itself. That query disguised the old Primary Key from SharePoint. I like to think of it as a bit of revenge for the trick where SharePoint bumps off our Primary Keys and calls them "_OldID". Well, yes, that is a bit silly, isn't it? SharePoint doesn't REALLY care one way or the other. It makes me feel good to think about it that way, though.
We'll take care of naming problem by renaming this New Primary Key to the same name the OLD Primary Key had. Again, the reason for doing that is to preserve the existing architecture of the Access Front End in which it will be used. All those forms and queries and reports expect to find a Primary Key called "WorkWorkKey" in this table. Don't disappoint them.
Pay special attention to the destination fields illustrated in Figure 16. You want the OLD Foreign Keys from the source table to go into the OLD Foreign Key fields in the destination tables. The names are not the same in the two tables, but you shouldn't be confused by that, right? Especially if you've been paying attention all along. In the next step, we'll go get the NEW Foreign Keys.
Take a look at the datasheet view of the records in this query, ready to be migrated on over to SharePoint.
As I said earlier, this table started out with almost 7,600 records. Because I took the time to stage and prepare our destination table in SharePoint, I've been able migrate that entire recordset in a single shot. It took almost two minutes to move them, but the append completed smoothly each time I re-ran it.
I have not forgotten. There are a couple of things left to do. The Foreign Key fields in this table still need to be updated. I showed you how I did that in my previous blog post. The procedure here is the same. In a query, join the two tables (tblwork and tblworkwork, for example) joining on the OLD primary and foreign key fields; that would be "_OldID" in tblWork and "WorkKeyOld" in this table. Update the NEW foreign key in tblWorkWork to the NEW Primary Key value from tblWork. Then you can delete the old foreign Key fields which are no longer needed.
It's a Fine Time to Be Here Irene
That's how I did it. It took a couple of tries to get it right, but in the end, I'm confident I can migrate data from any source table in Access (or SQL Server) to SharePoint, and do it quite efficiently.
You can too. Go on out there and migrate your old Access databases to SharePoint.
Here's the table I selected as a demo for you. I have to make a confession here, at the risk of getting unduly embarrassed. As you can see, the name of this table is "tblWorkWork". I don't know what I was thinking that day back in 2001 or 2002 when I first named this sucker "WorkWork", instead of "WorkDetail". I still don't know. As embarrassing as it is, though, it's always seemed like too much trouble to go back and rename it, along with all of the references to it buried in the bowels of the database. Maybe that'll be another project after this one, but probably not. It's tblWorkWork and that's that. I can live with it; and have been for 10 years now. Feel free to snicker if you'd like, though.
 |
| Figure 1. Source table with 7,593 Records to Migrate to SharePoint |
The first step in a planned migration is to create a staging query, based on the table to be migrated. It'll look like this one in Figure 2. It has several advantages over the previous "Brute Force" approach.
 |
| Figure 2. First Staging Query Selecting Fields to be Created |
Second, using a select query allows us to apply a filter to prevent any records from being migrated yet. I applied the criteria "WHERE 1=0" to get that result. In other words, a key element in this staging strategy is that, when we first create a SharePoint list from this table, we only establish the fields in it, no data. That frees us from worrying about which records might or might not successfully get migrated. Nothing is more frustrating that trying to sort out a partial transfer after a failure half way through.
It's that old Transactional Integrity thing. You know, everything gets committed or nothing gets committed.
It's that old Transactional Integrity thing. You know, everything gets committed or nothing gets committed.
My Relationships? It's Not Complicated, Really
Third, using a select query allows us to pre-alias the destination fields for the "OLD" foreign keys in the table. As you recall from the previous posts, one of the things we have to do with the tables after the data is migrated is to reestablish the Foreign Keys using the SharePoint approved "Lookup Field" method. Getting the proper fields pre-staged in this query makes that later step a little less of a hassle. Figure 2 shows three "_old" fields. One will be the Old Primary Key field (WorkWorkKey), and two will be the Old Foreign Key fields.
As you can see in Figure 3, the query presents us a "shell" or "template" of the fields we want to send over to SharePoint, without data complications.
| Figure 3. First Staging Query Datasheet Returns No Records |
 |
| Figure 4. Export the Template Query to SharePoint |
 |
| Figure 5. Select the SharePoint Site and Name the table |
| Figure 6. New SharePoint List On the Site |
Let me adjust that seat belt for you...
The next step in the staging process was to fix up this SharePoint list so it's all nice and tidy -- and safe -- for when I start pushing records into it.
Clicking on the list editing icons on the Ribbon in SharePoint takes us to the online screens where we can do that. First, I clicked on "List" under the List Tools tab, and then selected "List Settings". Those icons are highlighted in Figure 7.
 |
| Figure 7. Edit a SharePoint List |
Figure 8 shows you the screen where you'll make changes to the list. I'm intent on fixing up only a few things at the moment, so I won't walk through the whole screen.
 |
| Figure 8. SharePoint List Editing Screen |
And now you can see a fourth benefit of migrating tables this way. Apparently SharePoint didn't recognize that field as a Primary Key when it came through the query instead of directly from a table. Therefore, SharePoint didn't bump it off into the "_OldID" field and hide it from us. As far as SharePoint knows, I guess, it's just another field.
To us, that means we can fill it with the Old Primary Key values from the source table, and, later, if we need to, we can use it to update "downstream" relationships from this table. You saw that in the previous blog post. I'm not going to show it to you again in this blog, but that "downstream" table would be the "InvoiceDetail" table where I record each Work detail ("WorkWork") in a detail line on an invoice. If that last bit is not 100% clear, feel free to ping me for more details ( pun intended). I'll be happy to chat about what I'm doing here.
To us, that means we can fill it with the Old Primary Key values from the source table, and, later, if we need to, we can use it to update "downstream" relationships from this table. You saw that in the previous blog post. I'm not going to show it to you again in this blog, but that "downstream" table would be the "InvoiceDetail" table where I record each Work detail ("WorkWork") in a detail line on an invoice. If that last bit is not 100% clear, feel free to ping me for more details ( pun intended). I'll be happy to chat about what I'm doing here.
The link we need on this screen is highlighted in Figure 8, down near the bottom of the screen. It's called "Create Column". Clicking it takes us to a screen where we can define a brand new Lookup Field to serve as the Foreign Key.
 |
| Figure 9. Create a Lookup Field for a Foreign Key |
I split the screenshot into two halves (Figure 9 above and Figure 10 below) so you can see them better.
 |
| Figure 10. Name and Define a Lookup Field for the Foreign Key (Lower Screen) |
- selecting a related table and key field
- enforcing Referential Integrity on the lookup and so on.
Do You Want an Index With That?
 |
| Figure 11. Creating Indexes |
The answer, of course, is "Yes", you very much want that index. Indexes are the key to getting this table to handle large numbers of records smoothly and efficiently. If you need more background on the importance of indexes in tables, I suggest you do a Bingoogle search and read whatever turns up. Indexes are important in any database, and that goes for SharePoint Lists as well. In fact, much of the motivation behind what I'm doing here is to make sure that Relationship Field is predefined and indexed against the coming of the records in the near future.
I won't show you how I added the other Lookup field to serve as the new Foreign Key for WorkRate, it's just like this one, except for using a different name, different related table and different field name.
Now I'm going to show you how I manually added a couple of additional indexes. Take a look at Figure 12. Down at the bottom of the screen. There's a link to Indexed columns (or fields) in this list. That's where you go to add new indexes.
 |
| Figure 12. Adding a New Index |
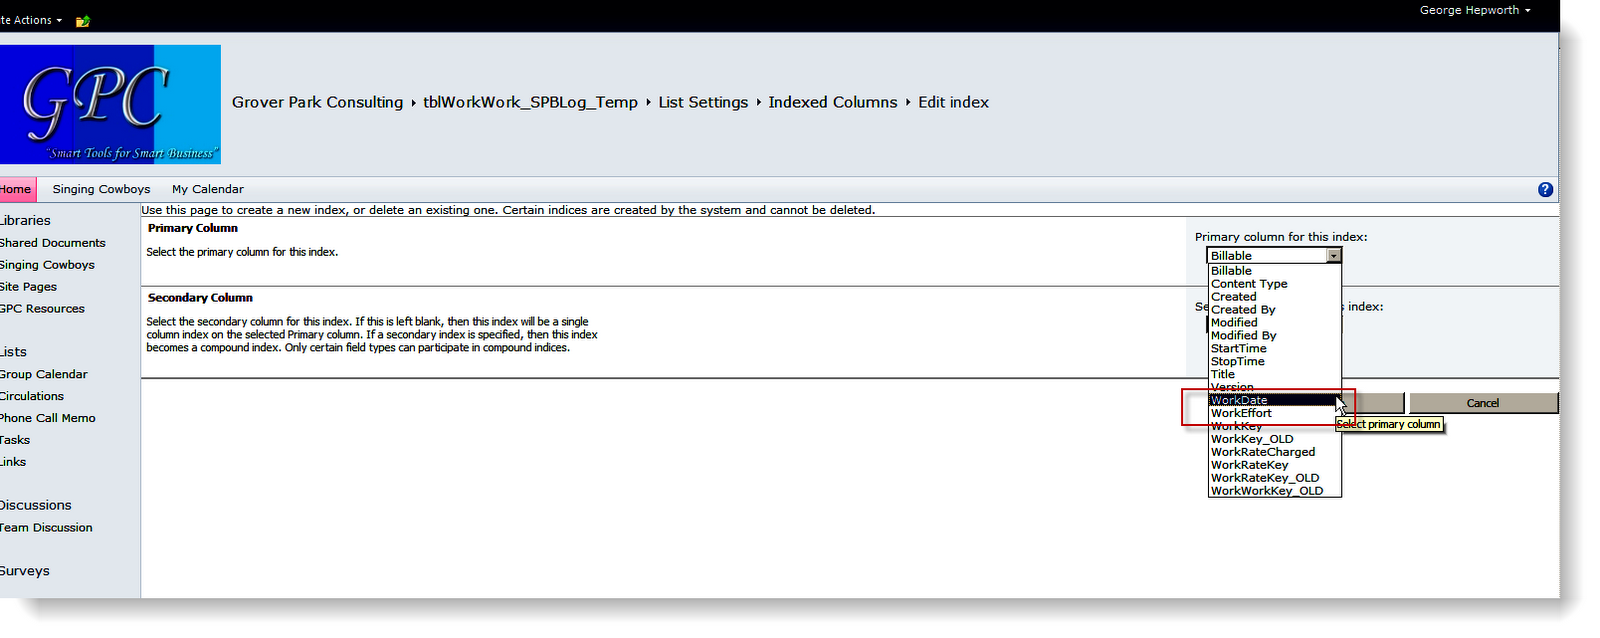 |
| Figure 13. Adding WorkDate Index |
 |
| Figure 13. New Indexes Are Added to WorkDate and WorkEffort |
Warning Index Robinson
This may seem a bit inconsistent, coming on the heels of telling you that indexes are very important and showing you how to create them, but I'm also going to warn you against getting all index-happy in SharePoint lists. For reasons beyond the scope of this blog discussion (it has to do with the architecture of SharePoint lists), we don't want to burden the list with too much indexing activity. Moderation in all things is always good advice. Foreign Key fields, like "WorkKey", for sure need them. Fields on which you might frequently filter or sort a list are also possible candidates for indexing. The thing is, once you've indexed a table and added a ton of records to it, most SharePoint installations won't let you change, add or delete any existing indexes. For example, on Office 365, that happens when you hit 5,000 records in a list. AccessHosting is a good deal more optimistic, but it still has a limit. Tread lightly here. Index the fields you must index (Primary and Foreign Keys are indexed by default), and judiciously index other fields if you really expect to hit them heavily in the interface. There's no going back, though, if you get it wrong and need to remove an index. You might end up starting over. Not unthinkable, but a PITA nonetheless.
Now it's time to head back on over to the Access side where we can link this new, empty SharePoint list back into our Front End database. Once we've done that, we'll be ready to pour records into it.
Open the Access accdb to which this list will be linked, and select the "More- SharePoint List" option on the "Import & Link" section of the "External Data" tab on the ribbon. See Figure 14.
| Figure 14. Go Get a SharePoint List |
 |
| Figure 15. Empty SharePoint List ready to Accept Records |
We'll take care of naming problem by renaming this New Primary Key to the same name the OLD Primary Key had. Again, the reason for doing that is to preserve the existing architecture of the Access Front End in which it will be used. All those forms and queries and reports expect to find a Primary Key called "WorkWorkKey" in this table. Don't disappoint them.
Also, keep in mind that I still have the two OLD Foreign Key fields as well as the two NEW foreign Key fields. Well, actually it's two NEW Foreign Key fields. The other two are fields that will serve as temporary placeholders for the Old Foreign Keys we'll need to supply in order to re-align the records we add to this table in the next step. Refer back to my previous post if that previous sentence sounded like complete gibberish to you.
Aren't We There Yet?
Almost there now. We need a new query to grab the records from the old source table and past them on to the new SharePoint table. You can see that query in Figure 16.
 |
| Figure 16. Append Query to Migrate Records from Source to SharePoint |
Take a look at the datasheet view of the records in this query, ready to be migrated on over to SharePoint.
 |
| Figure 17. Datasheet View of Source Table Records In Append Query |
Snug as a Bug in a Rug
 |
| Figure 18. 7,593 New Records Nestled Snugly in SharePoint List |
There they are, all 7,600 records in their destination table on SharePoint. I've repeated this same migration several times now, on both Access Hosting and Office 365. As long as the destination table is properly staged the way I showed you, with a Primary Key and Lookup Fields for Relationships defined and ready, Access and SharePoint can handle the migration without a glitch. I've not tested recordsets larger than this one. I strongly suspect I'll eventually find an upper limit on the number of records I can move safely. And I'm also sure having a fast Internet connection helps. Nonetheless, I'm pretty pleased with the results so far.
I have not forgotten. There are a couple of things left to do. The Foreign Key fields in this table still need to be updated. I showed you how I did that in my previous blog post. The procedure here is the same. In a query, join the two tables (tblwork and tblworkwork, for example) joining on the OLD primary and foreign key fields; that would be "_OldID" in tblWork and "WorkKeyOld" in this table. Update the NEW foreign key in tblWorkWork to the NEW Primary Key value from tblWork. Then you can delete the old foreign Key fields which are no longer needed.
It's a Fine Time to Be Here Irene
That's how I did it. It took a couple of tries to get it right, but in the end, I'm confident I can migrate data from any source table in Access (or SQL Server) to SharePoint, and do it quite efficiently.
You can too. Go on out there and migrate your old Access databases to SharePoint.